A flow so smooth you’d be wishing for conflicts to happen
 Photo by pexels.com
[I use VIM] (https://dev.to/omerxx/vim-from-foe-to-friend-in-9-minutes-2np0). These lines are written in VIM, and so does every single line of code I write. Git has become an integrated tool of almost everyone in tech and merge-conflicts are often a part of work.
Conflicts generally arise when two people have changed the same lines in a file… In these cases, Git cannot automatically determine what is correct. Conflicts only affect the developer conducting the merge, the rest of the team is unaware of the conflict. Git will mark the file as being conflicted and halt the merging process. It is then the developers’ responsibility to resolve the conflict. — Atlassian Git Tutorials
Solving a git conflict was always a personal hurdle; either I tried ignoring it by not doing the merge/undoing changes in HEAD or another hacky solution I found randomly.
Once I accepted the fact that conflicts happen I tried rebasing, by even setting my merge by default to git merge --rebase thinking this would make all conflicts go away.
But it turns out that rebasing won’t keep you away from conflicts; rebase applies your commits one by one on top of the target branch’s HEAD,
as such, rebase often introduces conflicts that must be dealt with to
git merge --continue.
The fugitive’s way
Vim Fugitive is an awesome plugin by @tpope. One of its awesome features is Gstatus and Gdiff which allow you to watch your project’s status and diffs much like using git status & git diff from your terminal or favorite git interface. There’s a very smooth way of dealing with these conflicts right inside VIM; using Gdiff when editing a conflicted file, fugitive would launch a three-way diff by surrounding your current workspace file. Two new buffers would appear: one for the target branch (i.e. the one you’re merging into), and the other would be the merge branch (i.e. the branch that is being merged to).
Validation of the previous concept: If I’m working on master, and I’d like to merge staging into it, I’d run git merge staging. In this case master being the target branch, and staging is the merge branch. This terminology is important for later reference to be clear on which buffer we’ll be choosing for the conflict resolution.
Here’s an excellent video by Drew Niel describing the above (practical VIM).
What’s more to say?
The method above goes through working with inconvenient buffer system and hard to follow commands like diffput or diffget which made little sense to me when I tried figuring out buffer name reference. The flow wasn’t smooth and I felt something was missing. To solve my problem, I used a few aliases integrated into my .vimrc so that resolving conflicts became enjoyable, smooth and most importantly — intuitive; I don’t want to think about what I’m doing, I want to do it. Plus, I want it to be better and faster than any other tool I’ve seen doing the same, by removing the complexity and unintuitive processes in the way.
My addition
Let’s review the additions I made to my .vimrc and how they become useful when solving conflicts:
" Fugitive Conflict Resolution
nnoremap <leader>gd :Gvdiff<CR>
nnoremap gdh :diffget //2<CR>
nnoremap gdl :diffget //3<CR>
The three lines above are all it takes to resolve a conflict with ease;
Start by typing <leader>gd as in git diff, which creates a three-way split screen described above. In my mapping, I use Gvdiff to split the panes vertically. If your preference is a horizontal view leave the v out: Gdiff.
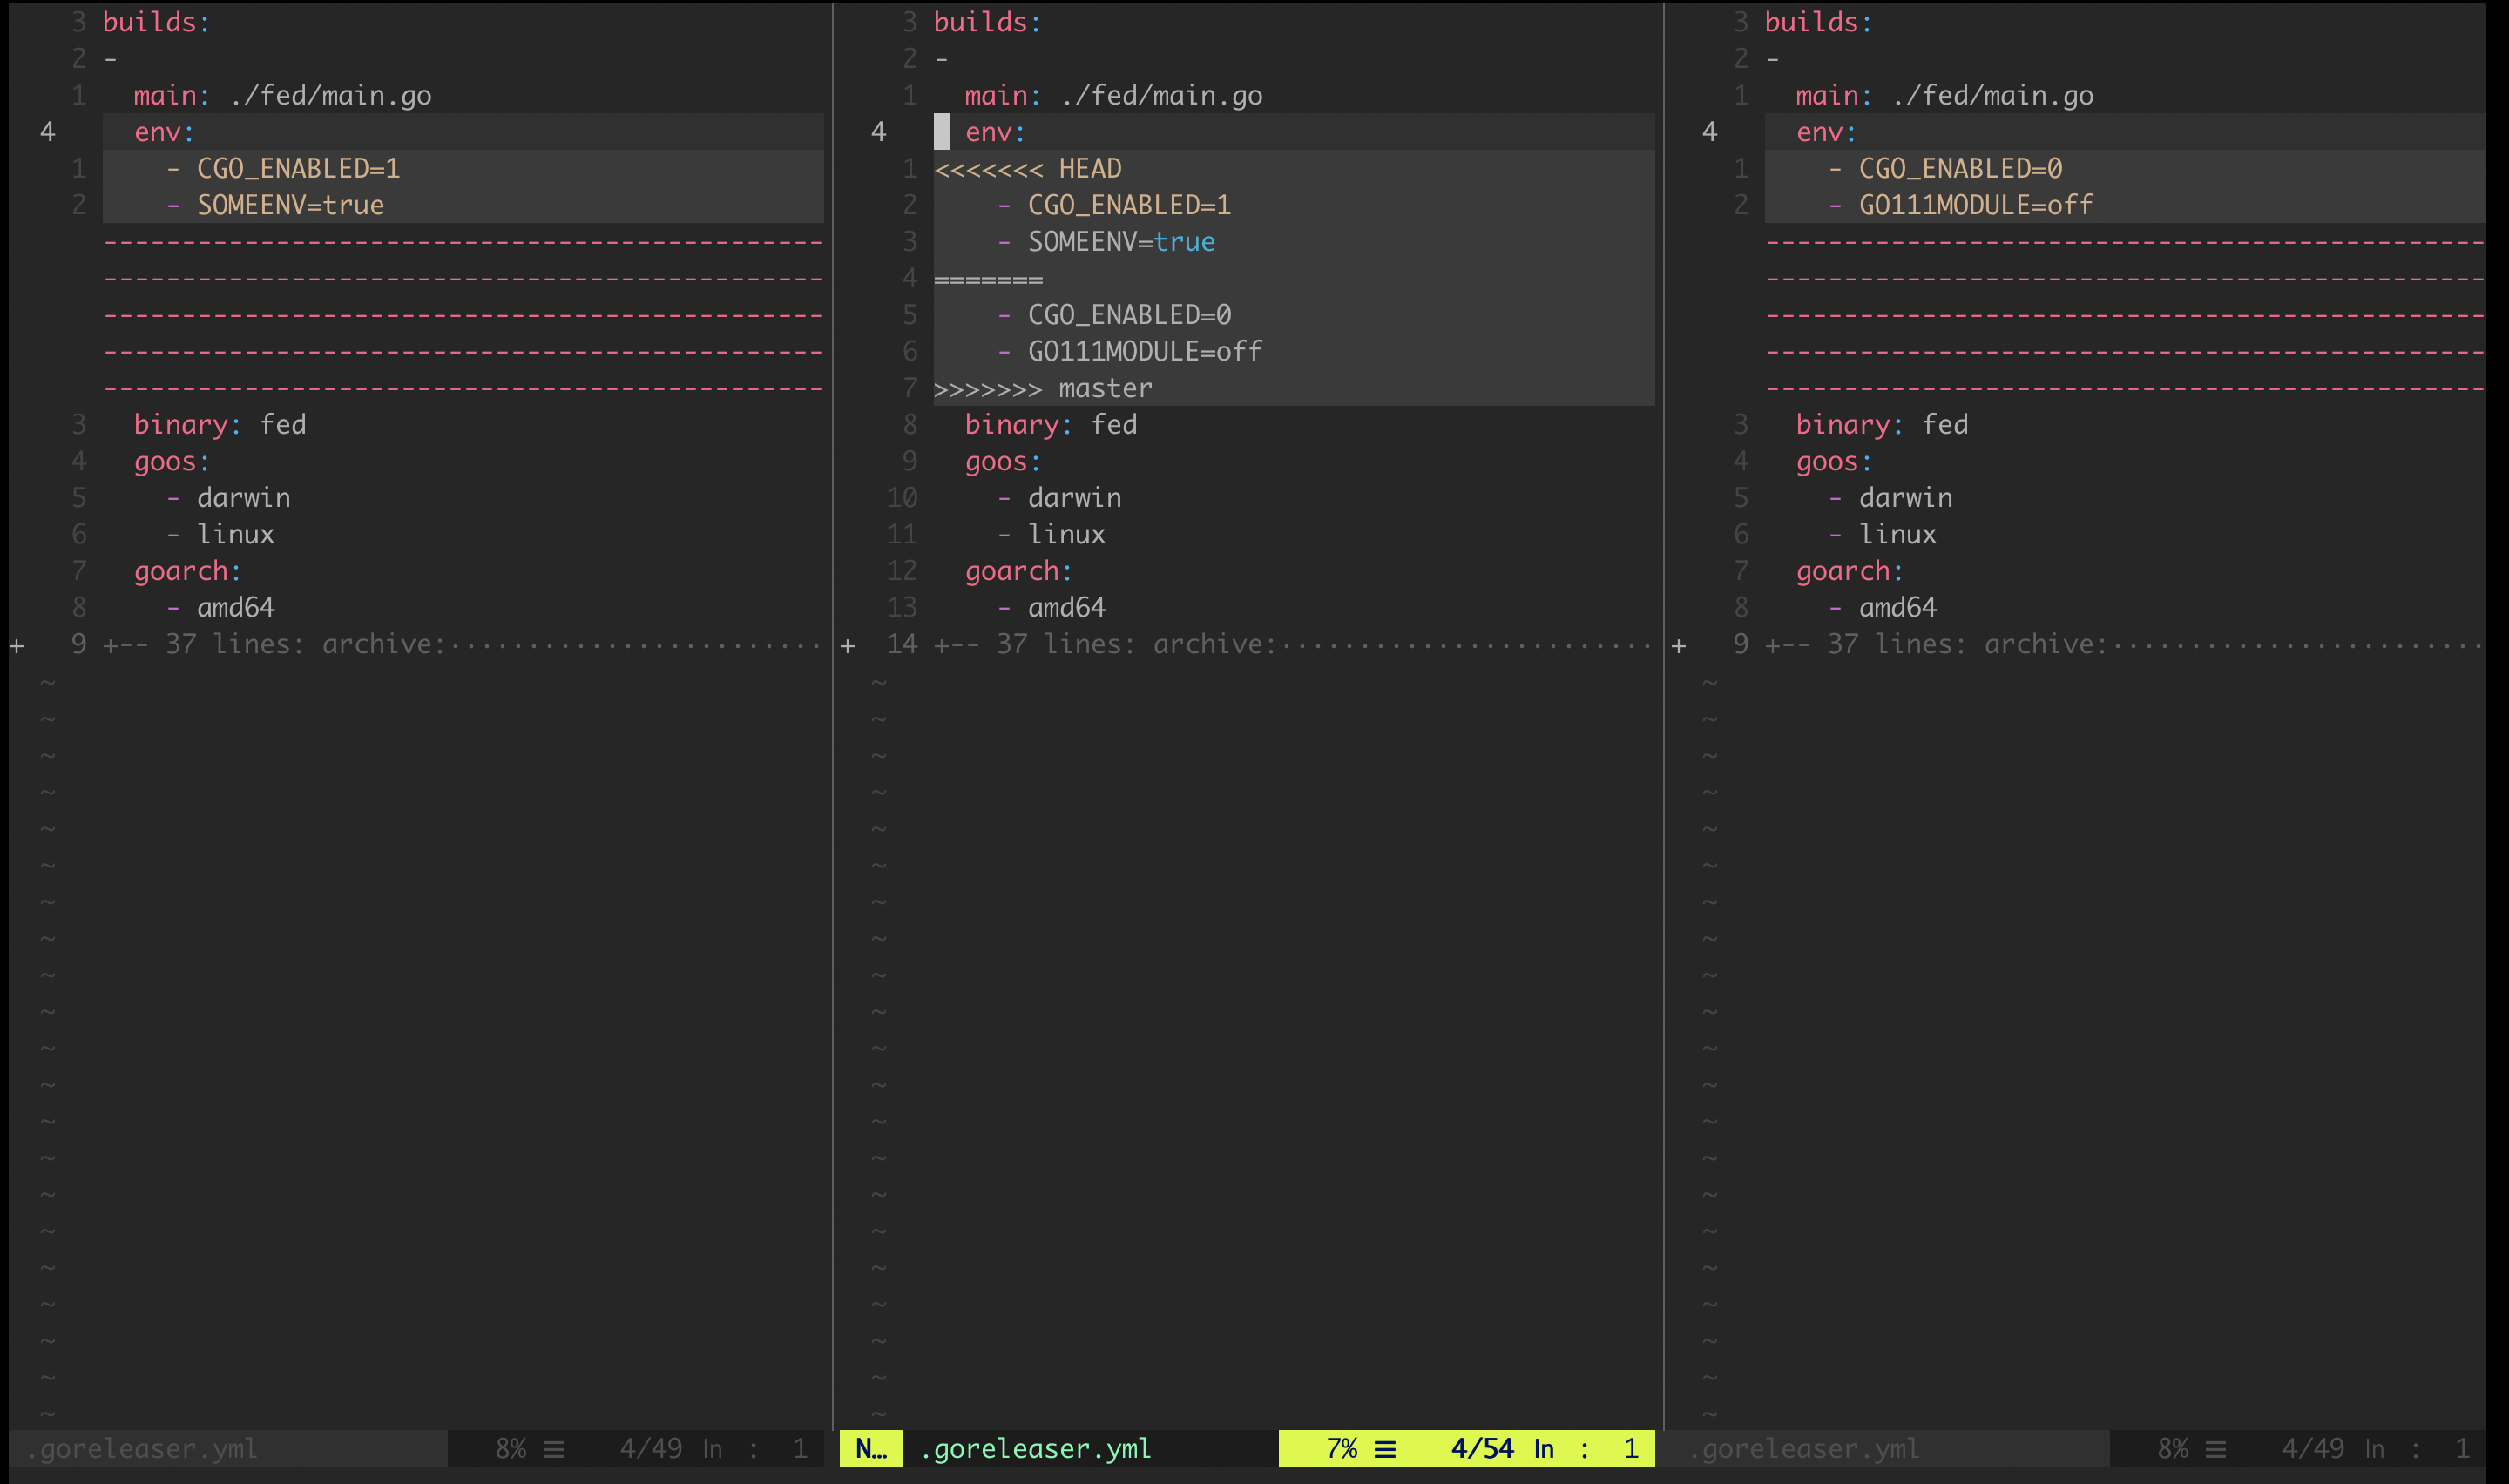
Here’s what it looks like:
 Git three-way diff
Note how the center pane is my current workspace, the left side is HEAD and how my code will look like should I choose that option, while the right side is describing master branch state.
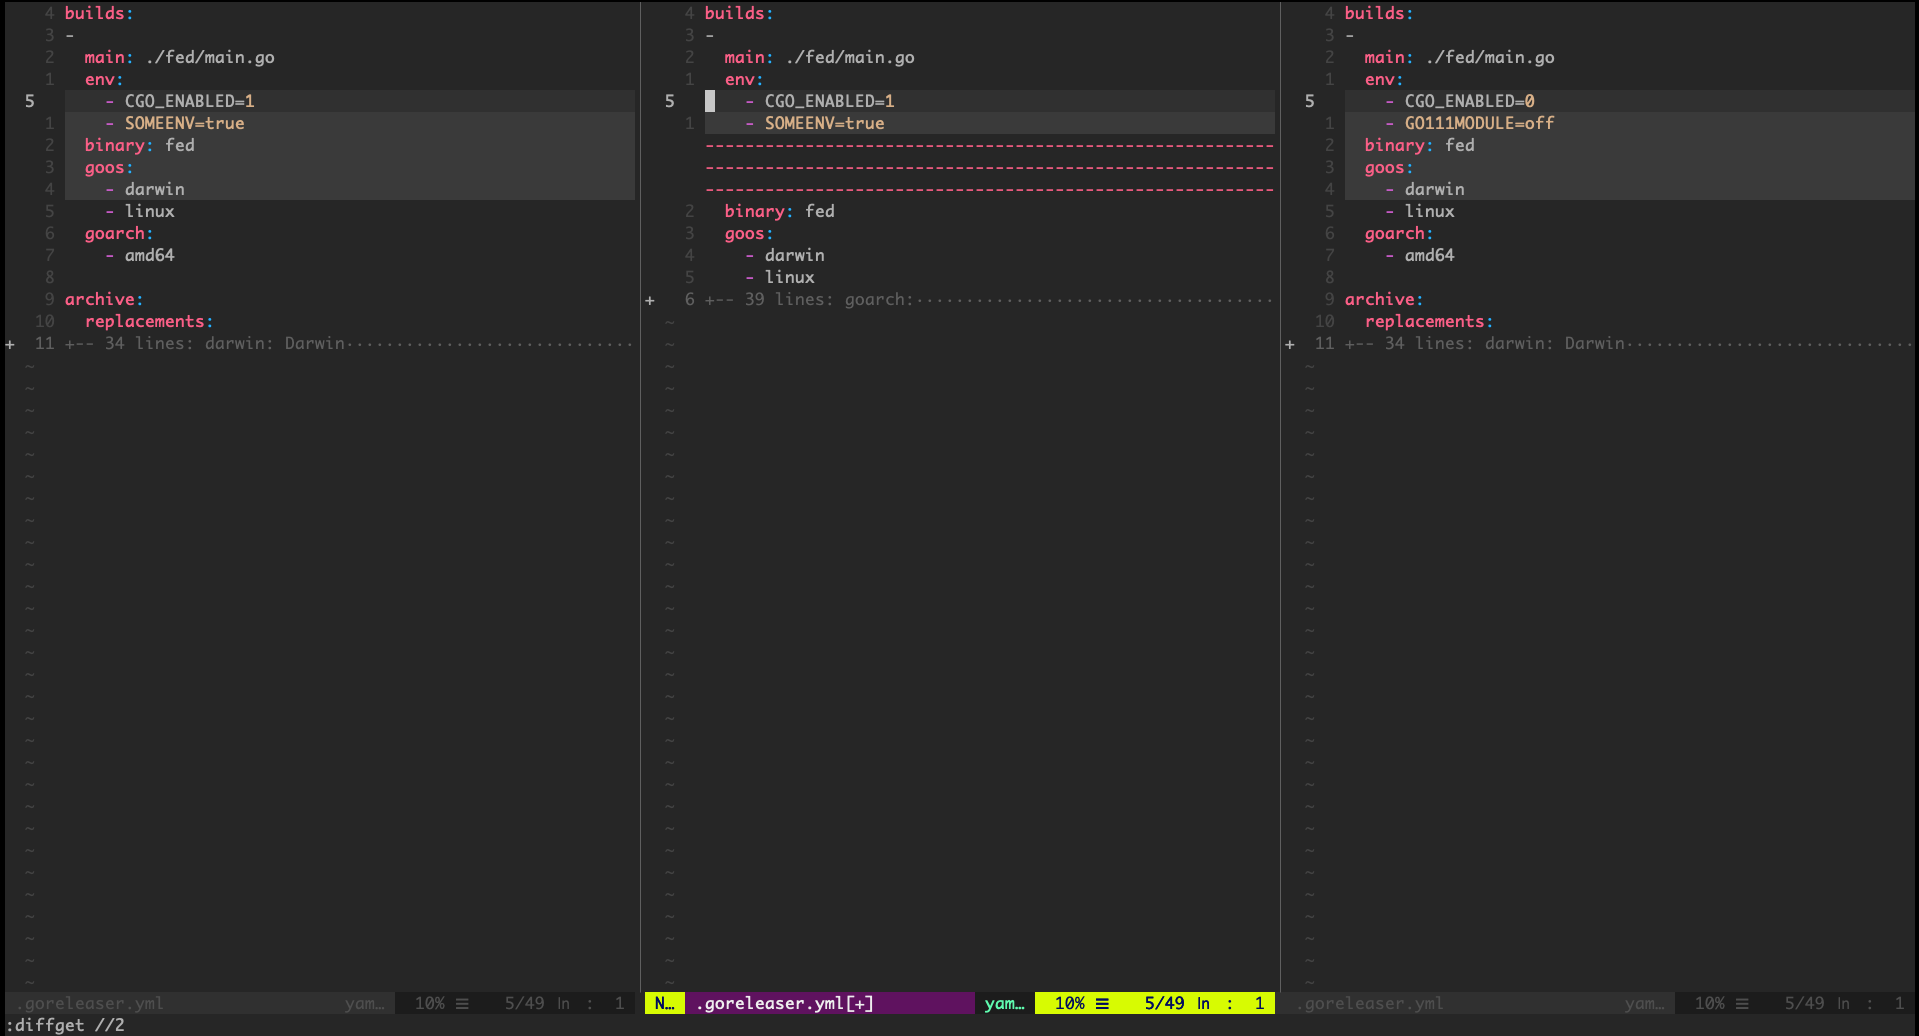
In order to decide on my changes in HEAD, according to my mapping, I type gdh, the gd stand for git diff and the h being VIM’s left key. I intentionally left the leader key out of this sequence as it is an inner process combination. After choosing master my current workspace changes to:
 Workspace pane after selecting the left side with
 gdh
Note that the actual command in the bottom left corner mentions
:diffget //2 which is fugitive’s way of getting the changes from the buffer with //2 in its name.
Useful additions to make this process whole:
-
Jumping to the next git hunk (or conflict to fix) can be done with
[cto backward or]cto search forward -
When you are satisfied with your workspace (usually when all conflicts are resolved) it’s time to leave just this pane open; we can do that with
<C-w>owhich tells VIM’s window manager to leave the current pane only.
That’s all it takes. Getting used to this sequence is a breeze, making conflicts life much easier (and fun) to work through.
My name is Omer, and I am an engineer at ProdOps — a global consultancy that delivers software in a Reliable, Secure and Simple way by adopting the DevOps culture. Let me know your thoughts in the comments below, or connect with me directly on Twitter @0merxx. Clap if you liked it, it helps me focus my future writings.


